A UIO can be cloned as follows:
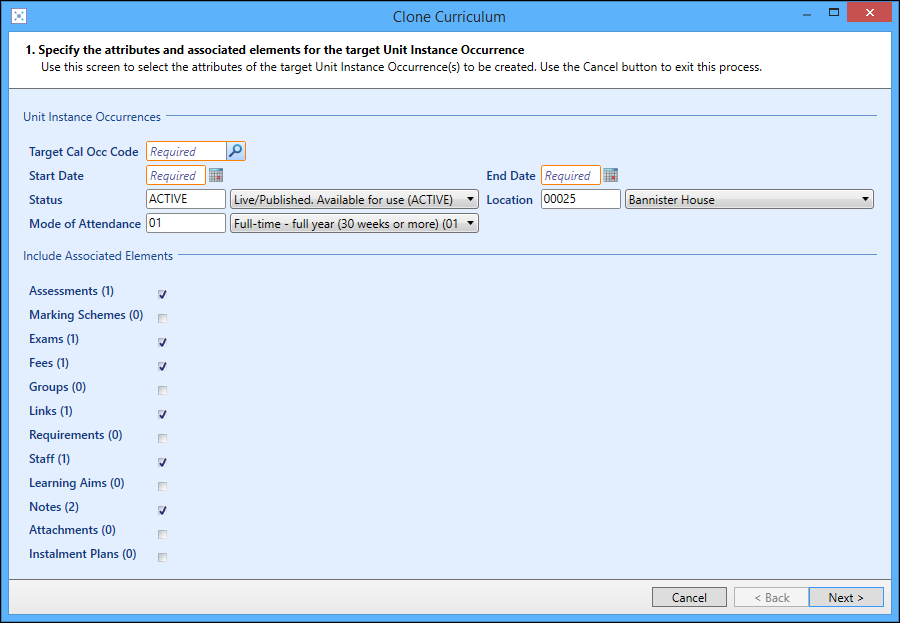
Screen 1 of the Clone Curriculum wizard is the initial screen displayed.
All field names in the wizard are configurable using the screen manager module.

The fields on Screen 1 of the Clone Curriculum wizard are described in the following table.
| This field | Holds this information... |
|---|---|
|
Target Cal Occ Code |
The calendar occurrence code for the target UIO. Click the Search button to display the Course Occurrence Search window, where you can select the required calendar occurrence code. Values entered are validated against Reference Data > Calendar Types > Occurrences. Values that are not available can no longer be entered for existing or previous calendar occurrences. |
| Start Date | Defaults to the start date of the selected target calendar occurrence code. |
| End Date | Defaults to the end date of the selected target calendar occurrence code. |
| Status |
Defaults to the option selected in the Default UIO Status for cloned UIOs institution settings. This can be changed by selecting a different option from the drop-down list, if required. |
| Location/Study Loc Code |
Defaults to the study location of the source UIO. This can be changed by selecting a different option from the drop-down list, if required. |
| Mode of Attendance |
Defaults to the mode of attendance of the source UIO. This can be changed by selecting a different option from the drop-down list, if required. |
| Include Associated Elements |
Whether the elements of the source UIO to be cloned. Click to clear a check box, to exclude that element from being cloned. If the source UIO does not have any associated records of an element type, the corresponding check box is not available. |
Click the Next button to display Screen 2 of the Clone Curriculum wizard.
The fields available on Screen 2 of the Clone Curriculum wizard depend on the options selected using Screen 1.
Associated Element Links Not Included
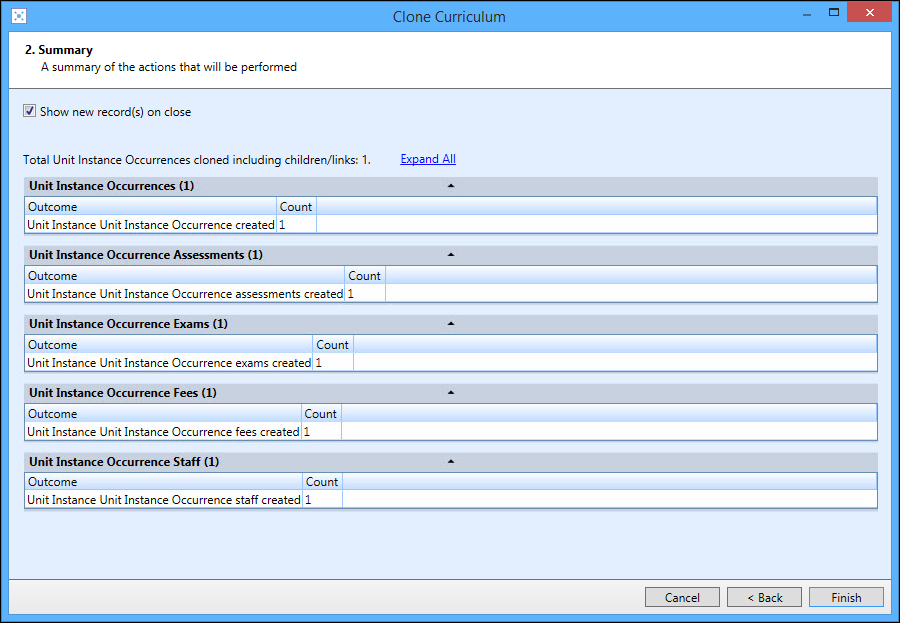
If the Links check box on Screen 1 of the wizard was not selected, Screen 2 will display a Summary of the UIOs and children/links to be cloned. For example:

If the Show new record(s) on close check box is selected, click the Finish button to open the Curriculum Details screen or UIOs grid in Curriculum Manager and show the cloned UIOs.
The cloned record is displayed in Curriculum Details or Curriculum Manager depending on which screen the Clone Curriculum wizard was opened from (that is: if the Clone Curriculum wizard is launched from the Curriculum Details screen, then the newly cloned record will be shown in Curriculum Details when the wizard closes).
Associate Element Links Included
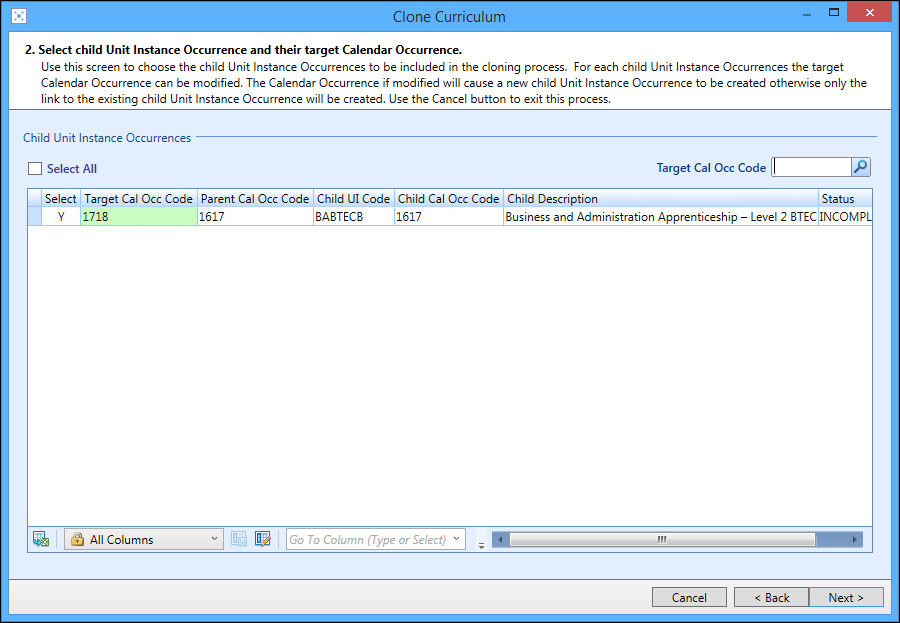
If the Links check box on Screen 1 of the wizard was selected, Screen 2 displays the child UIOs to be cloned.

To select the child UIOs, do one of the following:
-
Select the Select All check box to include all child UIOs in the cloning process
The Target Calendar Occurrence defaults to the calendar occurrence of the parent UIO. To change the Target Cal Occ Code, click the Search button to display the Calendar Occurrence Search window, where a calendar occurrence can be selected for the child UIOs.
- Select individual child UIOs by selecting the check box in the Select column of each required row, and then click in the Target Cal Occ Code field for each row to enter or select the target calendar occurrence
Click the Next button to display Screen 3 of the Clone Curriculum wizard.
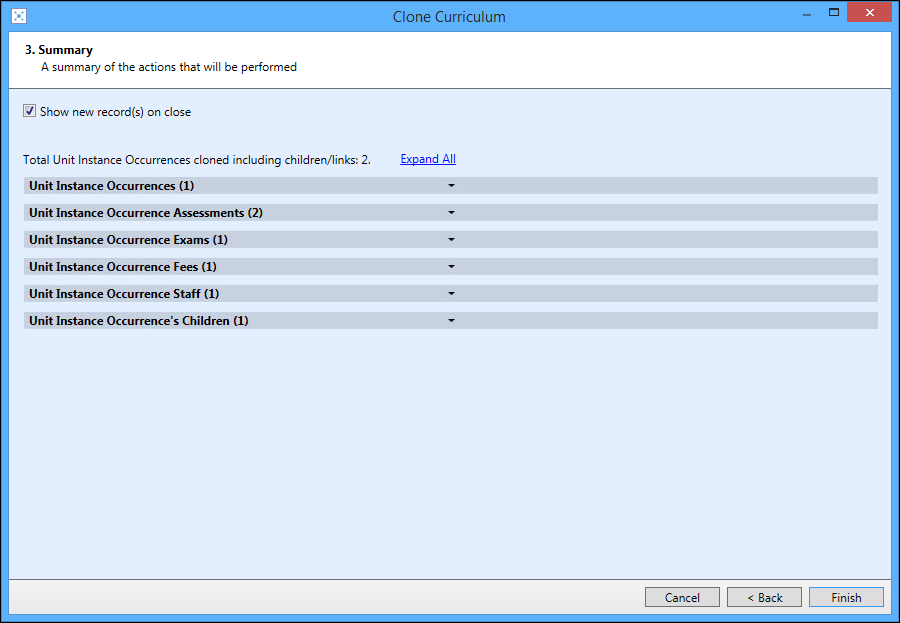
Screen 3 displays a summary of the UIOs and children/links to be cloned. For example:

If the Show new record(s) on close check box is selected, click the Finish button to open the Curriculum Details screen or UIOs grid in Curriculum Manager and show the cloned UIOs.
The cloned record is displayed in Curriculum Details or Curriculum Manager depending on which screen the Clone Curriculum wizard was opened from (that is: if the Clone Curriculum wizard is launched from the Curriculum Details screen, then the newly cloned record will be shown in Curriculum Details when the wizard closes).