Configure EBS to integrate with Entra External ID authentication by defining the required values in reference data, institution settings, testing the configuration, and then switch to external authentication.
Before configuring the integration with Entra External ID note the following prerequisites:
-
You must have completed the configuration of Microsoft Entra External ID.
-
You must have an account with permissions to define Reference Data and Institution Settings in EBS Central.
-
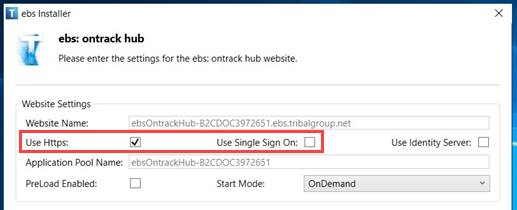
You must ensure that the EBS Ontrack Hub or Learner Hub web app features for the target EBS environment are set to Use HTTPS and not Use single sign on, as shown in the image below. If required, you can upgrade or reinstall to update these settings.
Set up the EBS integration with Entra External ID as follows:
Reference data
Define the required reference data for Entra External ID. On EBS Central, go to System > Reference Data > OIDC Issuers, and then define the fields as described in the table OIDC issuers.
| Field | Description |
|---|---|
| Issuer | Any value can be used but it should be unique to the EBS environment. For example, EntraExternalId. |
| EBS Property | Select the preferred email type. That is, College Email, Personal Email, or Personal or College Email. |
| Claim Name | This must be set to preferred_username. |
Institution settings
Define the required institution settings for Entra External ID as follows:
-
On EBS Central, go to System > Institution Settings > Authentication, and then define the fields as described in the table Authentication.
Authentication Module Field Description Ontrack Hub
External authentication Ontrack Hub Enabled You must leave this set to N, until you are ready to start using external authentication. External authentication Ontrack Hub URL Enter the external authentication URL for Ontrack, as defined In the Create external authentication Ontrack URL section of Configure Microsoft Entra External ID. External authentication Ontrack Hub OIDC Issuer Select the OIDC issuer configured in the Reference Data section above. For example, EntraExternalId. External authentication Ontrack Hub client ID Enter the Application (client) ID, as defined In the Configure app registration section of Configure Microsoft Entra External ID. External authentication Ontrack Hub token scope Must be set to openid profile. External authentication Ontrack Hub link message Enter the message you want to use as the link to external authentication on the Ontrack Hub. For example, Authenticate with external identity provider. Ontrack Learner Hub
External authentication Ontrack Learner Hub URL Enter the external authentication URL for Ontrack, as defined In the Create external authentication Ontrack URL section of Configure Microsoft Entra External ID. External authentication Ontrack Learner Hub OIDC Issuer Select the OIDC issuer configured in the Reference Data section above. For example, EntraExternalId. External authentication Ontrack Learner Hub client ID Enter the Application (client) ID, as defined In the Configure app registration section of Configure Microsoft Entra External ID. External authentication Ontrack Learner Hub token scope Must be set to openid profile. External authentication Ontrack Learner Hub link message Enter the message you want to use as the link to external authentication on the Ontrack Hub. For example, Authenticate with external identity provider. Important.You can also, optionally, adjust the remaining external authentication fields to contain your preferred text. -
Enable the external authentication registration page for new users. On authentication, go to External Authentication show Registration page to new users and define whether a new external user is shown the registration page to capture additional details, such as a date of birth.
Testing
You should test external authentication before switching for users. To do so, you must add URL parameters to the end of your Ontrack URL. This will display the page as if Entra External ID authentication is turned on. Note that URL parameters can also be used to bypass the EBS login page and direct users to authenticate using a specific authentication provider. For example, to ensure learners only see the option to authenticate using Entra External ID.
The table URL parameters describes the available URL parameters for testing and live systems.
| Module | URL Parameter | Notes |
|---|---|---|
|
Ontrack Hub |
/?EXTERNAL_AUTH_HUB_ENABLED=Y |
For testing: displays the page as if Entra External ID authentication is turned on. |
|
/?EBS_AUTH_HUB_ENABLED=Y |
For testing: displays the page as if Entra External ID authentication is turned on. |
|
|
/?AuthProvider=ExternalHub |
Authentication using external hub Entra External ID configuration. |
|
|
/?AuthProvider=Default |
Authentication using the default OIDC configuration. |
|
|
Ontrack Learner Hub |
/?EXTERNAL_AUTH_LEARNER_ENABLED=Y |
For testing: displays the page as if Entra External ID authentication is turned on. |
|
/?AuthProvider=ExternalLearner |
Authentication using external learner Entra External ID configuration. |
|
|
/?AuthProvider=Default |
Authentication using the default OIDC configuration. |
Switch to external authentication
Once you are happy with your settings and have tested that they are working as expected you can use institution settings to switch authentication method as follows:
- Ontrack Hub
- Go to Institution Settings > Authentication and then set External authentication Ontrack Hub Enabled to Y .
-
Ontrack Learner Hub
-
Go to Institution Settings > Ontrack Learner - Login Page > and then set Display Create Account panel on screen to Y - External Authentication .